
Please select the desired program:
QR Customizer Pro QR Customizer Pro Statistics
QR Customizer Pro Manual
QR Customizer Pro is a program to quickly and intuitively create professionally designed QR Codes. The current version can be downloaded free of charge here.
The program is multilingual. It is currently available in English, German, Japanese, Italian and Dutch. The language can be selected during installation and changed during operation.
All QR Codes are completely generated on the computer where QR Customizer Pro was installed. There is no hidden transmission or analysis of the entered data by the program, only the user can export the generated QR Codes as image files.
Contents
What are QR Codes
QR Codes (Quick Response Codes) are coded graphics, that can be read by current smartphones and tablets with the appropriate software. They form a bridge between the real and the virtual world. Nowadays it’s hard to find advertisements without this code. With one scan you get directed to a website, a product video or a download link in the App Store. Receive immediately information or the content you want, without having to type a link. Complete Business cards are imported within seconds. Even pre-formulated, pre-addressed mail and SMS as well as free text messages can be transmitted. With the enormous range of practical applications QR Codes are continuously gaining importance.
With this program you can easily customize your QR Codes with your logo or a photo and with different patterns, shadows, colors and effects. These customized designs produce a recognition value and add a personal touch to the code to stand out from other competitors.
Because not all QR Code scanner work the same way and use different camera systems, the requirements for readability vary by contrast and fault tolerance, so that the functionality of the generated QR Code and Custom-QR-Codes cannot be guaranteed. The user can customize the QR Codes with several options (colors, logo, patterns, shadows, effects, …) and is therefore solely responsible for the readability of the QR Codes and Custom-QR-Codes.
License
The software is free and can be installed on as many computers and freely distributed and copied.
Creating QR Codes without graphics (logos, patterns, shadows, effects, images) is completely free of charge. Once graphic elements (logos, patterns, shadows) are used, a separately purchasable license code is needed. As long as this is not enabled in the software, the generated QR Codes (so-called Custom-QR-Codes) contain built-in errors, so that the full functionality is free testable, but the QR Codes are not usable.
A purchased license key allows the activation of all features of the software on one computer. For activation, you must have an internet connection. To use a different computer with the same license code, the code must be previously deactivated in the activated version, for which a connection to the Internet is required.
The QR Codes and Custom-QR-Codes created with the software can be used free of charge for all media (internet, TV, print, …) for private and commercial purposes. The licensee must have all rights for self embedded graphics in the QR Code, including publishing rights.
Creating QR Codes for different purposes
With QR Customizer Pro you can create QR Codes for different purposes. All with this program generated QR Codes are UTF-8 encoded.
First select the desired function from the toolbar:
Text


This is the easiest and most flexible way to generate a QR Code. All other functions are only texts with special styles that are acknowledged by reading apps. Here you can enter any text that is displayed after the scan by a reader app.
URL

 Here you can enter a URL starting with http:// or https://. The reading app will access the link either directly or offer to open it in a browser. Thus, the user has quickly access the website, your video or your app in the App Store, without the need to retype a inconveniently long link.
With the button Create a Short Link you can create a short link to make the QR Code clearer. With our web application QR Customizer Pro Statistics you can change the destination link at any time afterwards and get detailed statistics.
Phone/SMS

If you enter only your phone number, the reader app will offer the number for telephoning. You can also enter a SMS text e.g. to participate in a lottery, to buy a ringtone or to complete a subscription. The SMS text can be up to 160 characters long.

Here you can create prescribed mails, for instance a pre-filled order form or a questionnaire, which the user can complete directly in their mail program and send. You can specify the email-address as well as a subject and content. Please note that long texts can make the QR Code difficult to read, especially for older scanner. For this feature to work, a default mail address has to be set in the smartphone. Some reading apps remove the subject und the text.
Business Card

 With this function you can import a complete business card with one scan to your contact list, so it saves a lot of writing work and should be on every printed business card.
Fill in all required fields. You can enter up to 4 telephone numbers and determine for each case whether it is a landline, mobile or fax number and whether it is private or business.
Important: Business cards contain a lot of data, so that the QR Codes are hard to read. With our online program QR Customizer Pro Statistics, you can create business cards online and get a short URL. So all contact data can also be changed later. In addition, an image can be specified therein, which can be exported.
WLAN

Important: Currently only Android supports the WLAN feature!
With this function you can set up your Wi-Fi access with just one scan in the smartphone, which is especially interesting for hotels, inns and cafes with free Wi-Fi access. Enter the SSID (the name by which your wireless router appears), the password and the encryption method.
Google Maps

Here you can show a point or an address on Google Maps or select a starting or finishing point for navigation.
 Select if you want to use an address (street, postcode, City, country) or coordinates for location marker. The coordinates are divided into latitude and longitude. You get them at https://maps.google.com Click with the right mouse button on a location and then select What’s here? In the search box the coordinates are displayed in the following form: 57.583905,-6.326821 (latitude,longitude)
You can choose the place to be displayed on the map or whether it should be used directly as a starting or ending point for navigation. You can also determine whether a classic map (Map), a satellite picture (Satellite) or a satellite picture with street names (Hybrid) is displayed and what zoom level is pre-selected.
With the button Create a Short Link you can create a short link to make the QR Code clearer. With our web application QR Customizer Pro Statistics you can change the link at any time afterwards and get detailed statistics.
PayPal

With this function you can receive PayPal payments as sales and donations. Required for this is your PayPal email address where you can receive payments. You must also specify whether this should be a purchase or a donation. For a donation, I would leave the other fields blank (a currency must be selected).
 You can specify an item name, an item price and the number as well as the currency and shipping costs.
Total = Quantity * Item Price + Shipping Costs
You can choose to ask the customer to specify a shipping address.
When specifying a Completing URL the buyer is forwarded there after payment.
When canceling the payment, he is led to the Cancel URL if he aborts the transaction.
If you specify a Logo URL, the graphic will appear on the top of the payment page.
With the button Create a Short Link you can create a short link to make the QR Code clearer. With our web application QR Customizer Pro Statistics you can change the link at any time afterwards and get detailed statistics.
App Download

Meanwhile, there are some smartphone systems (Android, Apple, Windows, Blackberry), requiring different implementations of apps and the apps must be purchased in different portals. In order not to create a separate QR Code for each system, you need a browser switch that leads the user to the appropriate link for his system. This program creates the needed browser switch for you.
First, enter the URLs to the different download pages. Leave unsupported systems blank. Visitors with an unsupported smartphone get redirected to the Fallback URL, the others directly to their App Store or what else was specified for it.
Then click on Generate PHP-file. You can then save the browser switch in PHP format and upload it on your web server. In the second step, enter the URL of your browser switch and create the QR Code. This has the advantage that you can change the links in the browser switch later.
With our web application QR Customizer Pro Statistics you can build browser switches, add to or change the links at any time afterwards and get detailed statistics.
Painting Tools

In the toolbar you find various painting tools to customize your QR Codes. Generally, you should use them only when the QR Code is final, because each text modification changes the QR Code.
 Save
Save
Here you can save the final QR Code. All QR Codes are saved in lossless PNG format, so that the graphics are internet suitable and can be viewed using any web browser.
 Standard
With the standard pointer, you can move the QR Code in the preview window pressing and holding the left mouse button. It works only if the QR Code is bigger than the preview window.
 Fill
Fill
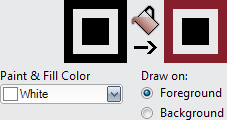 With Fill all connected bits with the same color get the previously set Paint & Fill Color. You have to set whether to draw on the background or the foreground (the dark bits). Square patterns with straight edges have only one color. Some patterns have a front and a background layer, which can be painted separately. By clicking the right mouse button, the selected foreground and background colors of a bit is reset. If you hold down the right mouse button, all touched bits are reset.
 Paint
Paint
 With Paint only single bits get colored with the Paint & Fill Color. You must specify whether the foreground or the background is painted so that you cannot paint with a foreground color on a background bit. If you hold the left mouse button, you can paint several bits. By clicking the right mouse button, the selected foreground and background colors of each block is reset. If you hold down the right mouse button, all touched bits are reset.
 Erase
Erase
 With Erase painted bits are reset to the selected foreground and background colors. If you hold the left mouse button, you can decolorize more bits.
 Decolorize
 With Decolorize all the color designs on the foreground and background will be reset with one click.
 Toggle Bit
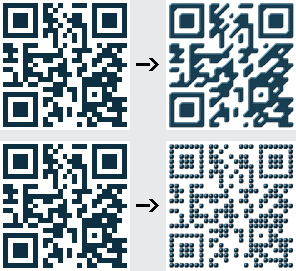
 When you generate the QR Code light and dark bits are set. Because QR Codes have a redundancy for error correction of 7% to 30% (from 20%, most QR Code are unreadable), some areas may be falsified or covered without impeding the readability of the QR Codes. This allows to integrate graphics or toggle individual bits from light to dark and vice versa, e.g. to bring a certain pattern or a word in the QR Code. With the bit toggle feature, you can invert individual bits. In contrast to the colored bits the inverted are considered properly for patterns.
Paint & Fill Color
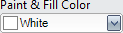 Here you specify what color you use for Paint and Fill.
Draw on:
 Here you can select if you paint on the light background or a dark foreground. For square patterns it would make no difference, but in curved patterns, this may be necessary.
Geometry
Size
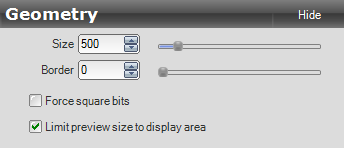
With Size you specify the size of the QR Code in pixels. QR Codes can be up to 5000 pixels. All QR Codes are always square. Changing the size does not change the content or previously integrated design adjustments. Therefore, it is recommended to initially work with a manageable size in order to introduce any design requirements. Because the preview is always in real time and some functions such as pattern, shadow or images can be computationally intensive, the operation is so much more fluid. Is everything to your satisfaction, you can increase the size accordingly.
Force square bits
The border is also specified in pixels. If the border is increased, the QR Code is correspondingly decreased. When using shadows the border should be large enough, so that the shadow does not get cut off.
Quadratische Bits erzwingen
At a fixed given image size, the individual bits are partly distorted minimally to fill the full size. This is hardly noticeable, because always sharp edges remain. If you elect Force square bits, all the bits are exactly square. In this way, the actual image size may change a little.
Limit preview size to display area
If you select Limit preview size to display area, large QR Codes are reduced to the size of the preview window.
Colors
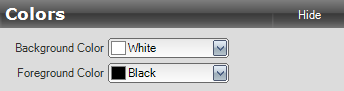
Background Color
Here you can set the background color of the unset bits. Please note that scanners need a good contrast to the foreground color to read the QR Codes well, so this color should always be kept light.
Foreground Color
With the foreground color you set the color of the dark bits. This should always be kept in dark colors to have a good contrast to the background.
Color Picker
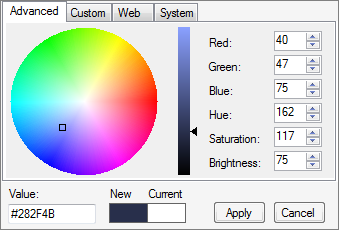
Use the color picker to select the wanted color. When you see the correct color in the new field press Apply to select it.
Logo
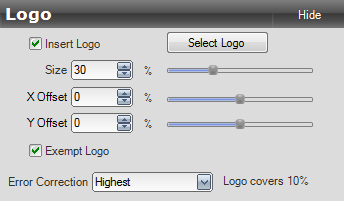
QR Codes have a redundancy for error correction of 7% to 30% (more then 20% of covered/changed bits are unreadable in most cases), so some areas may be covered, without impeding the readability of the QR Codes. You can include your logo or any image in the QR Code. You should test all finished QR Codes with several reading apps.
NOTE: This feature requires a full version. Without this, you can test this function without restriction, but the content of the QR Codes are made unusable with inserted X characters. For the development of this program several programmers and graphic designers have invested many months work, so that we cannot offer the full functionality of the software for free. We thank all who support our work by upgrading to the full version.
Insert Logo
 When you select Insert Logo, the graphic is displayed on the QR Code. As long as no logo has been selected, our Smiley is displayed.
Select Logo
Click Select Logo to download an image from your hard drive, which is displayed as a logo in the QR Code.
Size
Here you can adjust the relative size of the logo to the overall size of the QR Code. Thus, the ratio does not change when you change the size of the QR Code.
X and Y Offset
 Here you move the position of the logo on the X and Y axis.
Exempt Logo
This function deletes all dark bits that touch your logo automatically, so that the logo is exempt.
Error Correction
For QR Codes, there are four levels of error correction. You should always chose the lowest error correction, in order to keep the number of bits low and thereby improve the readability. But when you embed a logo what covers a part of the QR Code, the error correction has to be increased, so that the readability is maintained.
The program displays what percentage of the overall image is covered by the logo. Also, the error correction will be adjusted accordingly so that the QR Code is readable. While a logo is embedded, you cannot select a too low error correction. Also the correction level is automatically increased an even higher level may be needed in special cases.

When the logo is too large and the readability is critical, the display is highlighted orange. In that case, you should definitely test with multiple scanners, if the QR Code is still readable.

When the logo covers too much of the QR Code, the readability is unlikely or impossible and the field is highlighted in red. In that case, you should scale down the logo.

Pattern
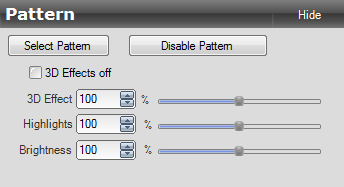
With our elaborate patterns, you can modify the look of your QR Codes quickly and professionally.
 NOTE: This feature requires a full version of what you need to purchase a license key. Without this, you can test this function without restriction, but the content of the QR Codes are made unusable with inserted X characters. For the development of this program several programmers and graphic designers have invested many months work, so that we cannot offer the full functionality of the software for free. We thank all who support our work by upgrading to the full version.
Select Pattern
Click Select Pattern and choose the desired pattern. We distinguish between Composite Graphics, where connected bits remain interconnected, and Single Graphics, where each bit is a substituted graphic. By clicking on a pattern the preview updates, with a double click the selection box is closed simultaneously.
3D Effects
All patterns are created with 3D effects. If you select 3D Effects off, the selected pattern is flat without 3D effects. With 3D Effect and Highlights you can adjust the brightening and the shadows separately. With Brightness you set the brightness of the complete pattern.
Create your own pattern
You can use your own pattern. To insert your pattern from your hard drive choose Upload Pattern. Once added, patterns appear at Your Single and Composite Graphics and can be deleted anytime.
The easiest way is of course a quadratic single graphic in PNG format. This may have alpha channel transparency, but you should not let too much of the image unused, as this reduces the readability of the QR Codes.
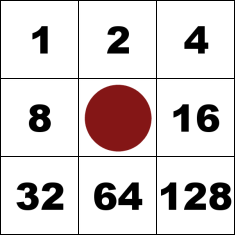
To allow changeable colors, 3D effects and highlights, a special color coding has to be used. Use as base color always #800000. Apply on this gloss and shadow effects with gray shades as needed. Finally, you select only the blue channel, and put the blue value to 128 – regardless of 3D effect and highlights.
The 3D effect interpolates between the red and blue channels, so that the intensity of the shadows can be adjusted. The green channel shows the intensity of the highlights.
 Single graphics should be 128 x 128 pixels in size and can have any name. To import an appealing preview graphic, create a second image with 256 x 256 pixels, select the same file name with a prepended _ (underscore). When you import this graphic too, it will be used as thumbnail graphic.
Composite graphics are much more complex. Here the bits may change the appearance depending on the neighboring bits. With 8 possible neighbor bits this results in up to 256 combinations. Should the pattern touch the empty bits (e.g. as with our diagonal patterns), you need also to create 256 combinations for the empty bits.
For performace reasons these 256 respectively 512 combinations are stored in one graphic. Each of the subgraphics can be expressed as a number depending on set neighbours adding the values in the graphic below.
 Example:
In the graphic at the left, the bit would get the number 2 + 8 + 16 + 64 = 90. If we would calculate an empty bit, we would have to add 256 – the result would be 364.
The total image must be 2176 x 2176 pixels in size, if not set bits are not used, otherwise
2176 x 4352 pixels. Each individual element is 128 x 128 pixels and has a margin of 4 pixels. This results in the graph shown below, where the numbers are the sum of the neighboring bits.
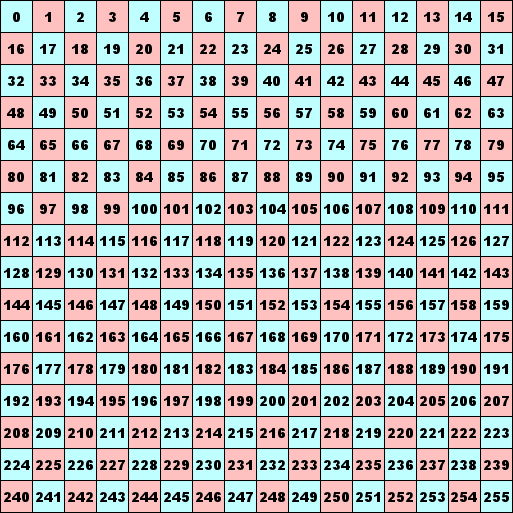
For some patterns, it is not necessary to create all 256 graphics. We take our previous example where the diagonal elements have no effect on the bit pattern. Of the possible neighbors who can influence our bit, we calculate a mask by adding the numbers with influence on the shape. For our example it is thus 90, so that the file must end with _90.png. This reduces the number of necessary graphics to 16. Therefore the following numbers must be placed of total graphic: 0, 2, 8, 10, 16, 18, 24, 26, 64, 66, 72, 74, 80, 82, 88, 90
Color coding and creating the thumbnails correspond to the single graphics.
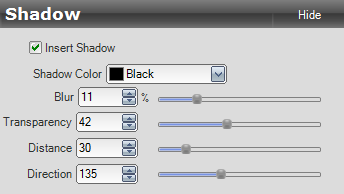
Shadow
With this function you can set a shadow for all set bits. This also works for all patterns.
 NOTE: This feature requires a full version of what you need to purchase a license key. Without this, you can test this function without restriction, but the content of the QR Codes are made unusable with inserted X characters. For the development of this program several programmers and graphic designers have invested many months work, so that we cannot offer the full functionality of the software for free. We thank all who support our work by upgrading to the full version.
To do this, select Insert Shadow. You can choose a shadow color and adjust blur, transparency, distance and direction. The blur is very hardware intensive and might take some time for large graphics.
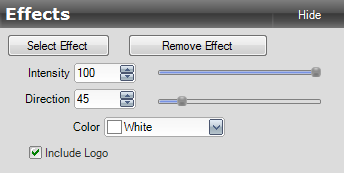
Effects
With this function you can apply different effects to a QR Code.
 NOTE: This feature requires a full version of what you need to purchase a license key. Without this, you can test this function without restriction, but the content of the QR Codes are made unusable with inserted X characters. For the development of this program several programmers and graphic designers have invested many months work, so that we cannot offer the full functionality of the software for free. We thank all who support our work by upgrading to the full version.
Select Effect
Click Select Effect to select the desired effect from the gallery or add self-created effects.
Effects Settings
With Intensity you can set how intensive the effect is. With Direction you can rotate the effect in each direction. Under Color you set the color of the effect. With white the image is lightened, with black darkened and with colorful colors colored accordingly. If you select Include Logo, the effect will be applied to the embedded logo.
Create your own Effects
As for the patterns, you can create your own effects. To do this, create a square image with alpha channel transparency in PNG format. As the color can be set in the program, you should only use white transparency levels. The generated preview image must be the same as for patterns and the name begins with an _ (underscore). Click Upload Effect to import your effect or preview image.
Images
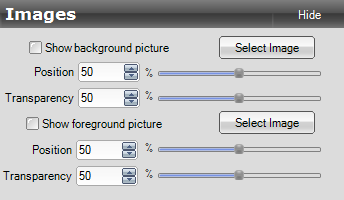
With this function you can set your own images for the background and the foreground.

NOTE: This feature requires a full version of what you need to purchase a license key. Without this, you can test this function without restriction, but the content of the QR Codes are made unusable with inserted X characters. For the development of this program several programmers and graphic designers have invested many months work, so that we cannot offer the full functionality of the software for free. We thank all who support our work by upgrading to the full version.
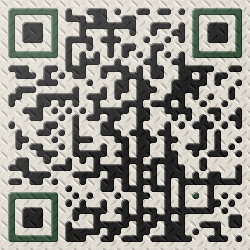
Image Settings
Click Select Image to load the required front or background image in JPG, GIF or PNG format from your hard drive. The shortest side is scaled so that it fills 100% of the QR Code. With Position you can slide over the longer side.
With Transparency you specify how transparent the image is and therefore how strong the underlying color shows through. You should always make sure that the contrast is set high enough so that scanners can read the QR Code.
There are already some images included to give your QR Codes as a look like metal, wood, structure, stone, … The images contained here may be used freely for commercial purposes. You can find the images in the folders Foreground for the darker foreground images and Background for the bright background images.
Frame
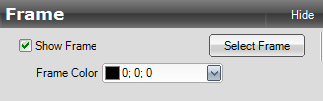
Here you can add a frame to your QR Code. The generated images are created in PNG format with alpha channel transparency, so that you can use the QR Code directly into your website.


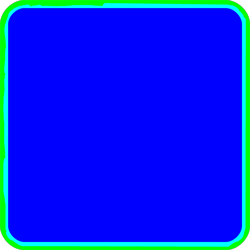
Click on the button Select Frame to select a frame from the preview or to use your own frames. The size of the QR Code does not change, the necessary border is added automatically, but can be changed afterwards. If the frames have a colored frame, you can choose the frame color.
Create your own frame
 You can create your own frames. The graphics used should be 2.500 x 2.500 pixels and must be in PNG format. The background is drawn on the blue channel (#0000FF). Everything in the picture that has a blue component, remains according to the strength of the blue component. The colored frame is calculated from the green channel (#00FF00), but the blue channel should also be included on the inner side (#00FFFF). The intensity of the green channel determines the intensity of the colored frame.
If you want to automatically assign a proper border, you have to add the border size in pixel at the end of the file name prpended underscore like filename_180.png. In this case a border of 180 pixels is used with respect to the image size of 2500 pixels. If you attach a -b the option to choose the frame color gets disabled. Thus, it should be appended only for images that do not use a colored frame. To create a custom preview file, you can create 256 x 256 pixels image and also upload it. This must hafe exactly the same name as the image file prepended with _ (underscore) eg _filename_180.png.
Create your own translation
If the language you want is not yet available, you can also create your own. To do this, go to the installation directory to the folder languages . There are some translations as en.xml (English translation) or de.xml (German translation). Open a file in a UTF-8 capable text editor and save it under another name with UTF-8 encoding. Now you can translate all the texts.
Start with the second line where you can enter the language in local language and in English use your name as the author of this trasnlation:
<translation revision="1" language="Italiano" languageInEnglish="Italian" author="Hot-World">
Now you go through all the rows. Please note that parameters such as $1 must be written exactly in the translation.
Example line English: <t id="L_LOGO_COVERS_X" ver="1">Logo covers $1%</t>
Translation into Italian: <t id="L_LOGO_COVERS_X" ver="1">Logo copre $1%</t>
If you have translated everything, save the file. The next time you start QR Customizer Pro the new translation appears in the language list.
You can also save a flag in PNG format with 16×16 pixels at the same location, which is displayed in the language selection.
Note: If you have created a complete and correct translation for a not supported language, you may like to send this to info@internetloesungen.com, so that we can take this for all. As a thank you receive a license code for the full version.
Used Libraries & Trademarks
QR Code
“QR Code” is a registered trademark of DENSO WAVE INCORPORATED.
MediaSlider written by Steppenwolfe
Homepage: http://www.codeproject.com/Articles/57127/MediaSlider-An-Alternative-to-the-Trackbar-Control
Licensed under the CPOL license: http://www.codeproject.com/info/cpol10.aspx
QrCode.Net
Homepage: http://qrcodenet.codeplex.com
The MIT License (MIT)
Copyright (c) 2011 George Mamaladze
Permission is hereby granted, free of charge, to any person obtaining a copy of this software and associated documentation files (the “Software”), to deal in the Software without restriction, including without limitation the rights to use, copy, modify, merge, publish, distribute, sublicense, and/or sell copies of the Software, and to permit persons to whom the Software is furnished to do so, subject to the following conditions:
The above copyright notice and this permission notice shall be included in all copies or substantial portions of the Software.
THE SOFTWARE IS PROVIDED “AS IS”, WITHOUT WARRANTY OF ANY KIND, EXPRESS OR IMPLIED, INCLUDING BUT NOT LIMITED TO THE WARRANTIES OF MERCHANTABILITY, FITNESS FOR A PARTICULAR PURPOSE AND NONINFRINGEMENT. IN NO EVENT SHALL THE AUTHORS OR COPYRIGHT HOLDERS BE LIABLE FOR ANY CLAIM, DAMAGES OR OTHER LIABILITY, WHETHER IN AN ACTION OF CONTRACT, TORT OR OTHERWISE, ARISING FROM, OUT OF OR IN CONNECTION WITH THE SOFTWARE OR THE USE OR OTHER DEALINGS IN THE SOFTWARE.
QR Customizer Pro Statistics Manual
About QR Customizer Pro Statistics
QR Customizer Pro Statistics is the perfect system for managing your QR Codes. The following advantages are provided:
- By creating short URLs your QR Codes require little data and are thus optimally readable for all scanners.
- Create short URLs for long links.
- Create browser switches with short URL to forward visitors to the corresponding link (eg to the correct page in the appropriate App Store).
- Created galleries in app-style with short URL.
- Create your own texts with self-defined MIME types with short URL (for advanced users).
- All links, browser switches, galleries and text can be changed later, without changing the corresponding QR Code, because the short URL does not change.
- For each entry, you can upload as many QR code graphics.
- You will receive informative statistics such as call-development and used smartphone operating systems for each entry. For your QR Code graphics you get call statistics.
- Intuitive operation and management of all entries
- Multi-user support
- Easy installation (PHP5 and MySQL is required)
Contents
Navigation
After login you will see a summary page. Above you see on all sides always a navigation bar, where you come to home, you can create new redirects, browser switches, galleries and texts, enter the setup, get information about the program, set the language (currently German and English) and log out.
Home
Here you see in a bar chart the visitors of the last 30 days of all QR Codes you manage in your account, so this is a general activity statistics. Based on the colors in the bar, you can see which systems (Android, iOS, BlackBerry, …) have been used. Below the graph you can set whether the last 30 days, a special month or a year gets displayed in the chart.
Below you find a table with all redirects, browser switches, galleries and texts. You can search through a filter for keywords and / or special types (redirects, browser switches, galleries and texts). Here you have the opportunity to edit an entry or get statistics for each entry.
Statistics
When you call the statistics for an entry you will get a bar chart with the visitors of the last 30 days. Based on the colors in the bar, you can see which system (Android, iOS, BlackBerry, …) have been used. Below the graph you can set whether the last 30 days, a special month or a year gets displayed in the chart.
Below this you get display statistics for each uploaded QR Code image where you can also set the displayed period.
At the end of the page you will find a pie chart, which shows the operating systems (Android, iOS, BlackBerry, …) of all users of this entry measured since creation.
Edit
When you edit an existing entry, you can edit all fields, without changing the associated QR Code because the short URL remains the same (unless you change the signature). Also you can delete the entry here.
You can also upload QR Code images, which should refer to the indicated short URL. You get a HTML code for each image to insert into your web page. When you use this HTML code the views of the image get counted. You can also edit and delete uploaded images. The image title is displayed when mouse hovers over the image. The comment is only for your internal labeling.
Creating new entries
All entries have an entry name and signature.
Entry Name: Under this name, the entry appears in the administration, it’s only for internal identification.
Signature: The signature is the resolving part of the short URL. It must be unique among all other signatures. Leave blank to assign a signature automatically. You can also assign a name (only numbers are reserved for entry IDs). It is important that you can not assign a double name. The signature is used for the short URL and should not be changed, otherwise the short URL changes and the QR Code must be renewed.
If you have created an entry, you will receive for each entry (whether redirection, browser switch, business card, text or gallery) a short URL, you must use as link for your QR Code. Only if you use the short URL for the QR Code, you will get usage statistics and can be changed afterwards the content.
Then you can upload QR Code images, which should refer to the displayed short URL. You get a HTML code for your web page for each image. If you use this HTML code, the views of the image get counted. You can also edit and delete uploaded data here. The image title is displayed when mouse hovers over the image. The comment is only for your internal labeling.
Creating a new redirection
With a redirection you create a short URL for a link, which provides some advantages. Often links are very long, so that the corresponding QR Codes contain a lot of data what is harder to read for older scanners. With the short URL you eliminate this problem. In addition, you can change the target URL at any time without changing the corresponding QR Code and you will receive detailed usage statistics.
To generate a new redirection, click Create – Redirection in the navigation bar.
When scanning the QR code, the customer is redirected to the Target URL.
If you have entered everything, click on the button Create Redirection.
Creating a new browser switch
With the browser switch, you create a short URL that identifies the used system (Android, iOS, BlackBerry, …) of the visitor and forwards him to the corresponding link (eg to the correct page in the appropriate App Store). Thus, you only need one QR Code for all systems, which offers some advantages. You can change all the URLs at any time, without changing the short URL and thus the corresponding QR Code, and you will get detailed usage statistics.
To generate a new browser switch, click Create – Browser Switch in the navigation bar.
Then you can specify a URL for each system (Android, Android Kindle, iOS, BlackBerry and Windows Mobile). If you do not support a system, you simply leave the field blank, in which case the PC / Other Devices URL is used.
If you have entered everything, click on the button Create Browser Switch.
Creating a new business card
With the online business card you can import all contact data with one scan into your smartphone or in your mail program. In the regular QR Code business card, all (and usually many) contact data are stored in the QR Code. Here you get a short website URL. Here, the vCard can be downloaded. When you open the downloaded file, it is added to your contacts. With some smartphones (eg iPhone) this does not work, here the vCard must be mailed via a email form and then open it to import.
You can change all contact data afterwards, without changing the associated QR code. You can also import images up to 200 x 200 pixels.
Here is an example, on the left is our online business card with logo, on the right the QR Code business card without logo:

To generate a new text, click Create – Business Card in the navigation bar.
Now fill the desired contact data and add a photo. If the image is larger than 200 x 200 pixels, it is automatically scaled.
If you have entered everything, click on the button Create Business Card.
Creating a new text
With text you can transfer any formatted text, eg as plain text information, HTML or XML. You can select the MIME type of the format from a list or even specify a format that is sent to the scanner as the format. This allows to select the correct program to display the data.
To generate a new text, click Create – Text in the navigation bar.
In the text you specify the appropriately formatted text. This feature is for advanced users to use purposes that are not solvable with the other options.
If you have entered everything, click on the button Create Text.
Creating a new gallery
Here you can easy create a gallery with unlimited photos. The gallery is designed in app style and optimized for mobile devices, so that the images can be enlarged. For each picture, there is an optional title and a link and an optional info web page for the gallery where you can place legal notice or general information about the gallery.
To generate a new Gallery, click Create – Gallery in the navigation bar.
You can optionally create an info web page with title. If you leave these fields blank, the info web page is not displayed. The content of the info web page can be designed using the HTML editor.
Then click Create Gallery. Now you can add photos to the gallery. For each picture, you can optionally specify a title and a link. Because the link is on the title, a title must always be specified for a link.
Setup (for users without administrator privileges)
Here you can change your login, your email address and your password. If you leave the password fields blank, the existing password is retained. You can also delete your account, including all data.
Setup (Administrator only)
If you go to settings, it is checked whether the program updates are available for disposal. If so, this will be displayed in a message box.
The settings are divided into five areas:
Settings
Here you can enter some basic parameters.
Installation URL: Enter the URL where you have installed QR Customizer Pro Statistics, eg http://<domain name>/qrcps
Short URL: The short URL specified here will be displayed at the entries. Regular is the short URL:
http://<domain name>/<installation directory>/s.php?s=$SIG
QR Code Image URL: The short URL specified here is used for the QR Code images to count the calls. Regular is the short URL:
http://<domain name>/<installation directory>/q.php?q=$QRCODE
Although this always works, you should try to keep the URLs as short as possible, so that the QR Codes require little data and always remain legible.
If you use an Apache web server, you can create a shortcut with a .htaccess file or directly in the Apache configuration of your server. For this, the rewrite module must be installed. To get http://<domain name>/s/$SIG as short URL and http://<domain name>/q/$QRCODE as a QR Code image URL, copy the following code and save it as .htaccess file in the root directory or in the Apache server configuration. You just have to adjust the path to your installation directory relative to the root directory.
RewriteEngine On

RewriteBase /

RewriteRule ^s/(.+)$ <installation directory>/s.php?s=$1 [L]

RewriteRule ^q/(.+)$ <installation directory>/q.php?q=$1 [L]
Date Format: Here you can select the date format displayed in the statistics.
User
Here you can manage all users and you can create new accounts by clicking on the button Add new user.
Create new user
Fill in the following fields for each new user:
Name: This is the login of the new user.
Email: The email address is required if the password gets lost. In this case, you will get a mail to reset the password.
Password: The password must have at least 8 characters.
If the new user should also get administrator privileges, the appropriate box must be checked.
Mails
The mail settings are used to mail vCards and to give the ability to reset a password. When resetting a password, you will receive an email with all the instructions to enter a new password. If you enable the password reset function, you must specify the mail server information, such as SMTP server, SMTP port, connection security, mail sender, SMTP user and SMTP user password.
Backup
We recommend that you perform regular backups to quickly restore the system in case of data loss (eg due to hardware failure, operator error, hacker attack).
First you must specify the path Mysqldump. Mysqldump is a tool that is included as part of the MySQL Server installation. It creates an image of the current database. On Windows machines, it is mysqldump.exe.
The backup itself is divided into two parts:
Program and image backup
Click on the button Download zipped files to download the entire program including all uploaded images as a ZIP file.
Database backup
Click on the button Download zipped database to download the current database as a zipped mysql dump. Please note when restoring your database from a backup, that more recent data will be lost and the saved state is restored.
System restore
Please make a regularly backup of the program and the database. This data can be cleared by hardware defects, improper operation or hacker attacks. Having a backup of the program including all uploaded images and a database backup, you can restore the saved state without much effort.
Proceed as follows:
Restore the program files and graphics
Play the ZIP backup of the program including the uploaded images on your server, eg in your home directory. Unzip the backup. In this directory the original installation directory will be created and the data will get extracted there.
Alternatively, you can extract the zip file to your local computer and copy the files via FTP to the appropriate destination directory on your server.
Restore the database
Your last database backup contains a zipped file called qrcps-database.mysql. You must import this extracted file into the database. Most MySQL administration tools contain an appropriate function for this purpose. To restore the file manually, extract the file to a computer where you can access the database and where the MySQL client is installed. Type in the command line the following command:
mysql -h <MySQL IP Adresse> --port==3306 -u root -p <database name> < qrcps-database.mysql
Replace <MySQL IP Address> and <database name> with your data.
After your database is restored. If the database already exists and has more recent data, these get deleted.
Update
When updating or upgrading a new version is installed, which automatically adapts the database tables. You should to make a backup of the program including all uploaded images and a backup of the database before each update or upgrade. You can make a backup at the menu item Backup within seconds. With the backup, you can restore the current status at any time.
Autoupdate
If an update is available, an automatic update is offered. Click the button Autoupdate to version x.x.x. The update will be automatically downloaded and installed and adjusted if necessary the database. Just wait for the confirmation and the update is finished.
Manual update / upgrade
Download the ZIP file for the update or upgrade to a newer version on your computer and select the file here. If you click on the button Install update / upgrade, the file is uploaded and the program will automatically update. Please wait until the process is complete.
